Overview
Each Flxpoint plan allots a designated number of SKUs to your account. Flxpoint may charge you for any SKU overages on your account.
This guide will teach you how to locate the total number of SKUs within your account. To stay within your plans limits, you can delete unneeded SKUs and block those SKUs from importing on a Get Inventory Job moving forward.
Use the tools below to ensure you are within your plan's SKU allotment.
Calculate your Total SKU Count
Total SKU count is determined by the highest count of SKUs in either your source inventory, product catalog, or channel listings section of your Flxpoint account.
| Example |
|
Account A has 200k Source Inventory variants, 150k Product Catalog variants, and 300k Channel Listings. Account A's total SKU count = 300k SKUs Account B has 400k Source Inventory variants, 100k Product Catalog variants, and 50k Channel Listings. Account B's total SKU count = 400k SKUs |
How to Calculate Your Total SKU Count
- Navigate to Source Inventory
- Click Calculate Total to the right of the search bar
- Take note of the total
- Repeat for Product Catalog and Channel Listings
- The highest number of the three sections is your Total SKU Count

How to Reduce Your Total SKU Count
- Identify Unneeded SKUs
- Delete the Uneeded SKUs
- Determine how you would like to block future SKUs (i.e. by category, brand, SKU, UPC, etc.)
- Add a Do Not Import Rule to each source
Delete Unneeded SKUs
- Select the variants you wish to delete
- Navigate to the Actions dropdown
- Select delete
- Acknowledge the pop-up by typing "I Understand" and confirming the amount of products to be deleted
| Example |
We strongly suggest "delisting" any listing before deletion. |

Source Inventory
To reduce SKU count in the source inventory section of Flxpoint you can use the directions above.
- You will need to keep in mind that if another Get Inventory Primary job is ran before configuring the Do Not Import Rules for what was deleted, the products will be imported on the next scheduled job.
Product Catalog
To reduce SKU count in the product catalog section of Flxpoint you can use the directions above.
- Remember that deleting the catalog variant will delete the listing(s) from Flxpoint channel listings section.
Channel Listings
To reduce SKU count in the channel listings section of Flxpoint you can use the directions above and found here.
- When deleting a product (Product/variant) that's "Linked" will leave the listing on your channel and also stop price and quantity syncs. It is suggested to perform "delisting" on any product or listing before deletion.
Configure Do Not Import Rules
If you delete SKUs from your Source Inventory Section and this inventory is being imported via an automated integration this will likely reimport.
You can base your Do Not Import rules off of individual SKUs, categories, brands, etc. and can also leverage Flxpoints' Lists feature in your Post Mapping Workflow rules to protect against unwanted products importing on a Get Inventory Primary job.
Post Mapping Workflow Rules
-
Navigate to the source you deleted products from that you need to configure Do Not Import rules for
-
Select your Get Inventory Primary integration > Edit > Continue to Step 3 and you will see the Post Mapping Workflow section
-
Construct rules based on certain conditions described above like maybe a certain Brand you want to block from importing
- These rules will follow the following format, no matter the condition: "IF Condition is X THEN Do Not Import Set to True" so "IF Brand is Apple THEN Do Not Import Set to True"
-
Once you have your rule complete, press Ok and Save and Complete editing the integration. The items identified in the Do Not Import rule(s) will be blocked from importing into your source inventory
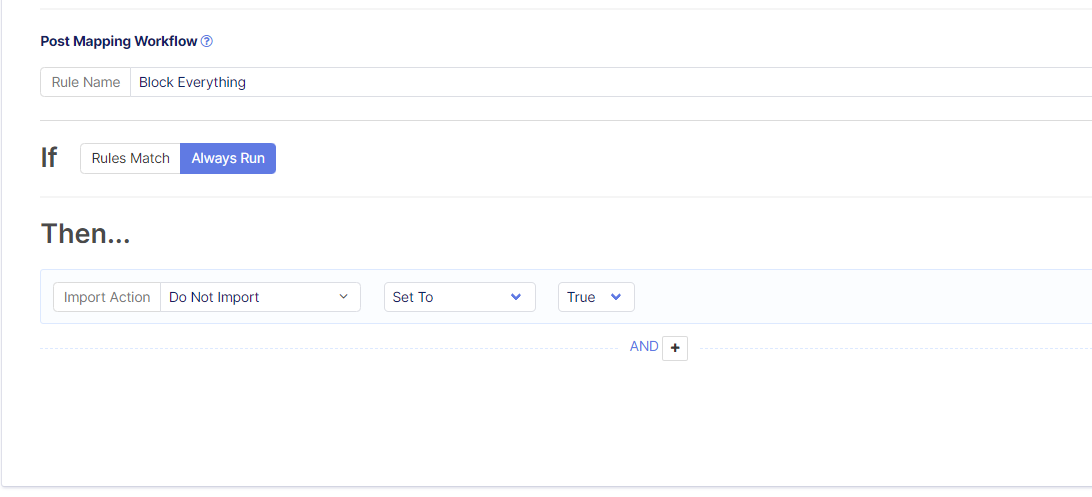
| Example: Block Everything |
|
If you wish to block everything from a particular sources Get Inventory Primary you can set an Always Run rule that says Do Not Import Set to True |
Do Not Import Lists
|
If a large amount of products are going to be deleted from Source Inventory and you want to block them from importing with a Do Not Import rule like we just learned above, the process would look like the following: |
- Identify what SKUs you are going to be deleting and select them
- Before deleting the SKUs navigate to the Actions Tab > Export > You can export the Variant SKU and maybe another identifier like Variant Title. SKU is what's important as we will use that export to upload into Flxpoint and create a List. You can see below I am exporting 50 Not Linked Source Inventory variants

- Once you have the export downloaded navigate to general settings > mapping utilities > Lists
- On that screen you will click "New List" in the top right and can name your list. After that you can upload your export and make sure to use the header from your file that represents the values you are blocking


- On that screen you will click "New List" in the top right and can name your list. After that you can upload your export and make sure to use the header from your file that represents the values you are blocking
Do Not Import Lists
| Bulk Deletion & Blocking with Listings |
|
If a large amount of products are going to be deleted from Source Inventory and you want to block them from importing with a Do Not Import rule like we just learned above, the process would look like the following: |
- The next step would be to create another rule underneath the "Block Everything" rule that would be to set a certain brand back to Do Not Import Set to False
