This guide provides a comprehensive overview of Flxpoint's Order Timeline, designed to track and manage the full lifecycle of orders. Explore what the Order Timeline is, how to use its features, follow a hands-on tutorial, and refer to detailed examples and tools, tailored for all users, especially newcomers.
🔍 What Is the Order Timeline?
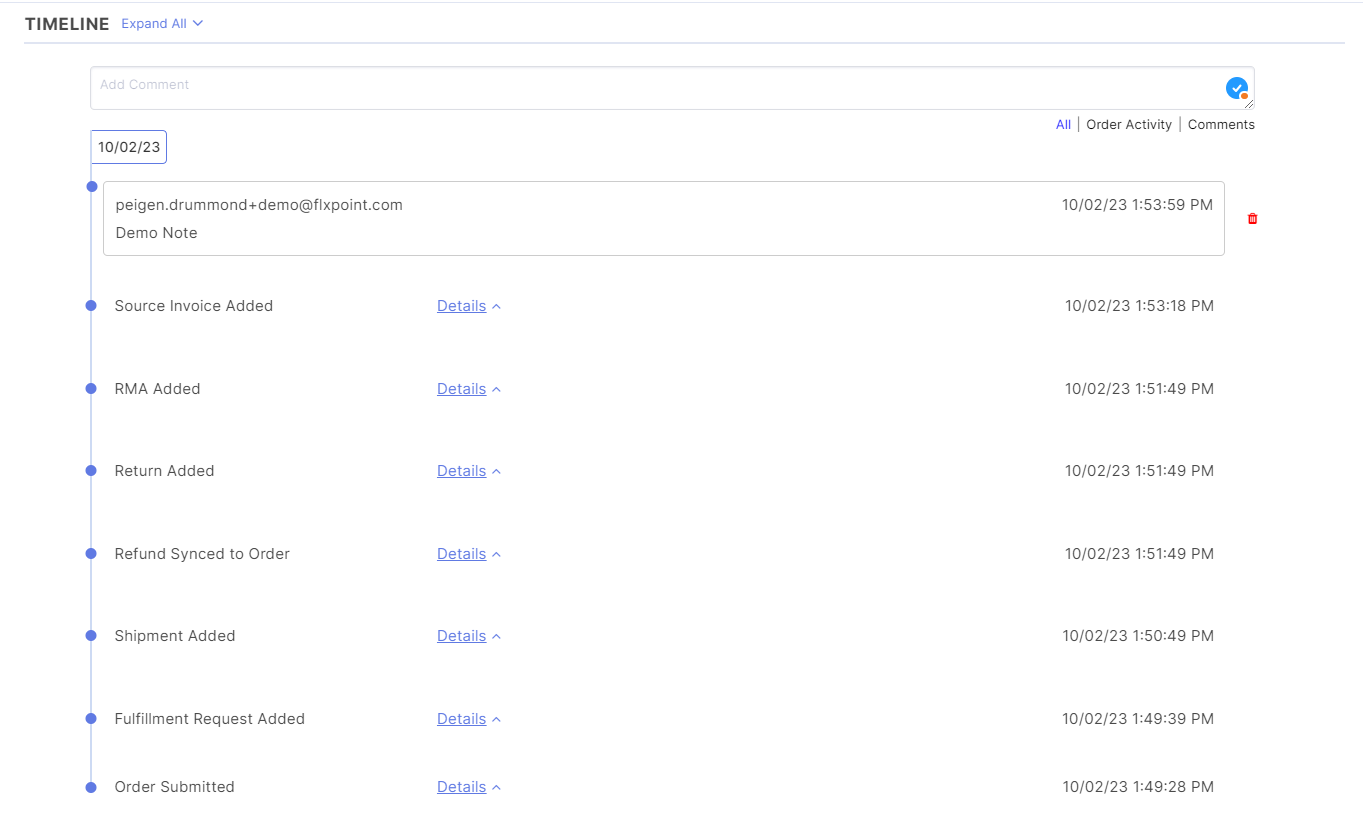
Flxpoint's Order Timeline is a powerful feature that provides a clear, chronological history of an order’s lifecycle. It tracks every significant action, from order creation to fulfillment, and serves as a communication hub via its comment functionality. The timeline is displayed in reverse chronological order, with the most recent events at the top, ensuring quick access to the latest updates.
Key features include:
- Data Points: Each stage of the order (e.g., creation, shipment, cancellation) is logged with details like action, user, timestamp, and notes.
- Comments: Users can add notes to discuss order-specific details, fostering collaboration.
- Filters: View all activity, only order actions, or only comments for focused analysis.
- Notifications: Alerts for new comments ensure timely communication.
Example Scenario:
- An order is created, and a data point logs the action with the user’s name and timestamp.
- A team member adds a comment requesting clarification on an order detail.
- Another user responds, and a notification alerts the team until the comment is viewed.
- Users filter the timeline to view only comments to focus on the discussion.
This tool illustrates how data points provide detailed order history in the Order Timeline.
🛠️ How-to Guides
A. How to View Timeline Data Points
- Navigate to the order in Flxpoint and click the Order Timeline button.
- Review the list of data points, displayed in reverse chronological order.
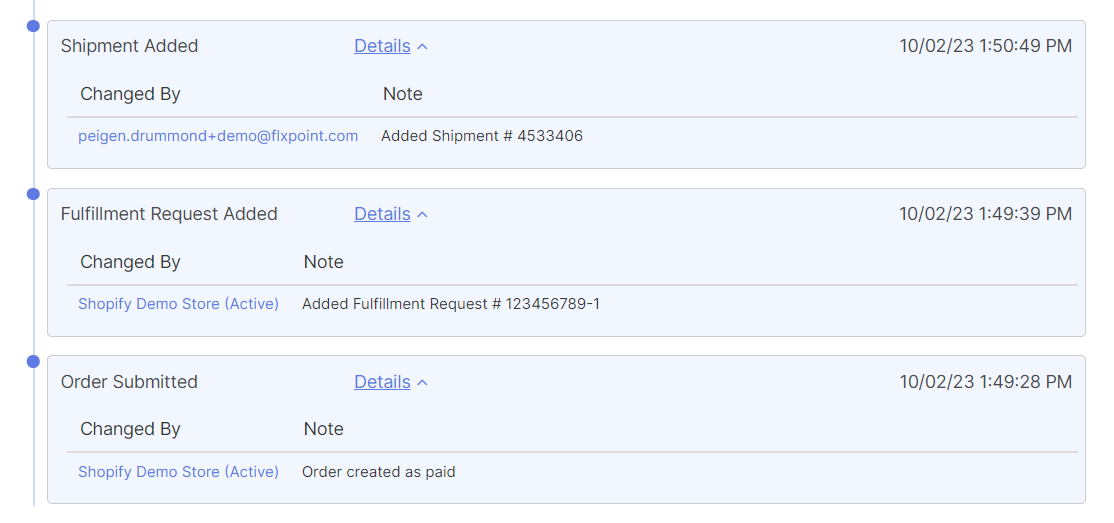
- Click the Details button on a data point to expand and view:
- Action committed (e.g., "Order Shipped").
- User who performed the action.
- Date and time of the action.
- Additional notes, if any.
- Click Expand All to view details for all data points simultaneously.
B. How to Add a Comment
- Open the Order Timeline for the desired order.
- Locate the comment field at the top or bottom of the timeline.
- Enter your comment (e.g., "Customer requested expedited shipping").
- Press Enter to save and add the comment to the timeline.
C. How to Delete a Comment
- Ensure you’re logged into the account that created the comment.
- Locate the comment in the Order Timeline.
- Click the red trash can icon next to the comment.
- Confirm deletion if prompted.
D. How to Use Timeline Filters
- Open the Order Timeline.
- Locate the filter options (All, Order Activity, Comments).
- Select a filter:
- All: Displays both order actions and comments.
- Order Activity: Shows only order-related actions (e.g., creation, shipment).
- Comments: Shows only user comments.
- The timeline updates instantly to reflect your selection.
This tool explains the comment process to improve team collaboration.
🧪 Tutorial
Manage an Order Timeline
Goal: Add a comment, filter the timeline, and review notifications for a sample order.
Scenario: You’re managing an order and need to communicate about a delay in processing.
Steps:
- Open the order in Flxpoint and access the Order Timeline.
- Add a comment: “Order processing delayed due to inventory check, expected completion in 2 days.”
- Press Enter to save the comment.
- Check that a notification icon appears on the Order Timeline button for other users.
- Apply the Comments filter to view only comments.
- Expand a data point to review details of the order’s creation or other actions.
This tool helps you understand how to use filters to manage the Order Timeline effectively.
📚 Reference
Timeline Data Point Fields
| Field | Use |
|---|---|
| Action | Describes the event (e.g., "Order Created", "Order Shipped") |
| User | Name of the user who performed the action |
| Timestamp | Date and time the action occurred |
| Note | Additional context or details (optional) |
Example Timeline Events
| Action | User | Timestamp | Note |
|---|---|---|---|
| Order Created | Jane Smith | 2025-06-10 10:00 AM | Order imported from Shopify |
| Comment Added | John Doe | 2025-06-10 11:30 AM | Customer requested expedited shipping |
| Order Shipped | System | 2025-06-11 09:00 AM | Shipped via UPS Ground |
Learn: Understand Comment Workflow
Click to explore the lifecycle of a comment in the Order Timeline.
Step 1: User enters a comment (e.g., "Awaiting supplier confirmation").
Step 2: Comment is saved and added to the timeline with a timestamp.
Step 3: A notification icon appears for other users.
Step 4: Notification clears once the comment is viewed.
Step 5: Original user can delete the comment if needed.
Tip: Use comments to keep all order-related communication in one place.